BOOT FROM FLASH AS UEFI!
First, let’s install Ubuntu and get a step closer to our goal of RAID1. When you get to the storage configuration screen, select “Custom storage layout” and follow these steps:
- Reformat both drives if they’re not empty.
- Mark both drives as a boot device. Doing so will create an ESP(EFI system partition) on both drives.
- Add an unformatted GPT partition to both drives. They need to have the same size. We’re going to use those partitions for the RAID that contains the OS.
- Create a software RAID(md) by selecting the two partitions you just created for the OS.
- Congratulations, you now have a new RAID device. Let’s add at least one GPT partition to it.
- Optional: If you want the ability to swap, create a swap partition on the RAID device. Set the size to the same as your RAM, or half if you have 64 GB or more RAM.
- Create a partition for Ubuntu on the RAID device. You can use the remaining space if you want to. Format it as ext4 and mount it at /.
When you have followed the steps above, this is what it will look like:
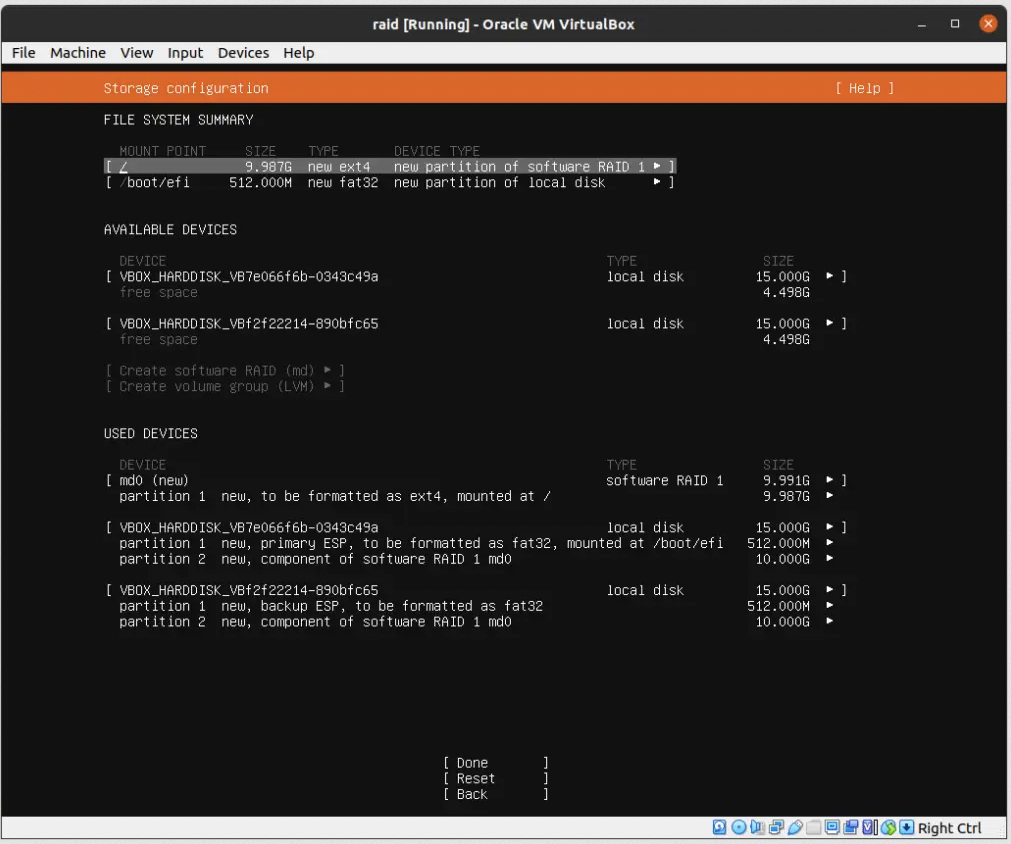
Save the changes and continue along with the installation.
Avoid slow boot
Remove btrfs-progs to speed up the boot process in case of a drive failure:
Make sure both drives are bootable
Congratulations, you now have a redundant setup! You can check the status of the RAID by running the following:
If the RAID has completed syncing you’ll be able to crash or remove one drive and run off of the remaining hard drive.
However, while this is fine, there is one potential lurking issue. If you remove one drive, you might be unable to boot the system. So let’s make sure the ESP is the same on both drives, and that the system will try to boot from either of the hard drives and not just one. Ubuntu’s installer should have taken care of this for you, but feel free to check.
First, show the partition UUIDs:
Take note of the UUIDs belonging to the first partition on both drives. In this case, it’s the ones starting with 0577b983(sda1) and 98d444f0(sdb1).
Next, check what drive you’re currently using:
As you can see, we’re currently using sdb1, so that’s working. Let’s copy it over to sda1:
Now we have a working ESP on both drives, so the next step is to make sure both ESP exists in the boot-list:
You should see two entries called Ubuntu. Make sure the UUIDs are the same as the two you took note of earlier.
If an entry is missing, you’ll need to add it.
Example of how to add an entry for the UUID starting with 0577b983(sda1) if it’s missing:
You should now be able to remove any of the two drives and still boot the system.
https://alexskra.com/blog/ubuntu-20-04-with-software-raid1-and-uefi/
- Log in to post comments